If you’re running a business and managing multiple social media accounts, you know that writing captions for each platform can be time-consuming.
Every platform has its own audience and tone, so a caption that works well on Instagram may not perform the same on LinkedIn or Facebook. This makes creating engaging social media captions for every post a repetitive and challenging task.
Writing captions for every platform takes time. AI helps you generate them from your content faster, so you can spend less time writing and more time publishing.
With the right setup, you can simply give the AI a prompt and get engaging, platform-specific captions in seconds.
TL;DR
- Install and activate Bit Social on your WordPress site.
- Connect the social media accounts where you want to publish.
- Go to AI Prompt and connect your OpenAI API key.
- Create a new AI prompt for captions using Smart Tags like
{post_title} and {post_content_short}.
- Choose the right model, set the temperature, and save the prompt.
- Add that prompt to your post template inside Bit Social.
- Use WP Auto Post to publish captions automatically when a post goes live.
- Or use WP Post Schedule to generate and publish AI captions at a scheduled time.
How AI Caption Generators Simplify Social Media Automation
A social media automation tool makes it easy to schedule and post content automatically. Even with AI, creating captions and updating them for different social media platforms can still take a lot of time and effort.
With an AI caption generator, you just enter a short prompt, idea, or description of your content. The AI reads the context, understands the message, and generates a caption based on your prompt. This makes posting faster, easier, and helps you stay consistent across all platforms.
Using Bit Social to Create AI Captions Automatically
Bit Social is a social media automation plugin for WordPress that makes it easy to share your content across social platforms. It lets you automatically post WordPress content to social media, schedule posts for the best time, and customize posting templates. You can keep your social media active without doing everything manually.
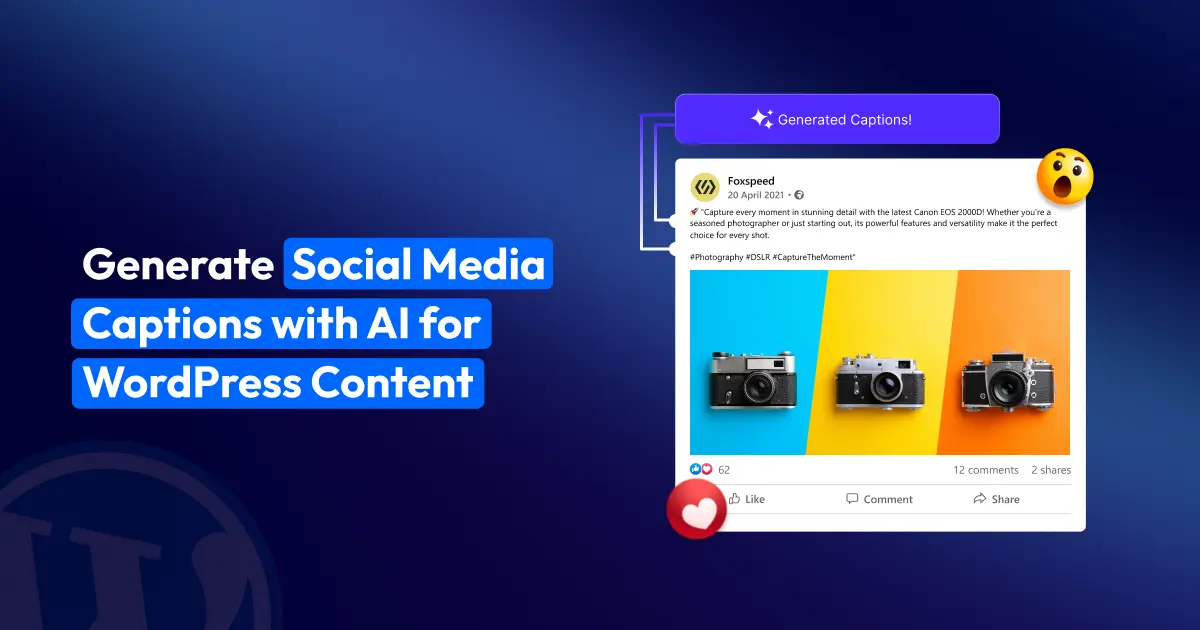
To make things even easier, Bit Social also includes an AI Prompt feature that helps you generate social media captions automatically. You simply write a short instruction for the AI, and it creates captions based on your post content. For example, you could use a prompt like:
“Write an engaging Instagram caption for this post: {post_title} – {post_content_short}.”
Bit Social replaces these smart tags with the actual post details and sends the prompt to the AI. The AI then generates a relevant caption whenever you publish or schedule a post that helps save your time while keeping your social media posts engaging and consistent.
Step-by-step: How to Generate Social Media Captions with AI in Bit Social
Follow these steps to set up AI caption generation in Bit Social.
Step 01: Install and Activate the Plugin
Start by installing Bit Social on your WordPress website. From your WordPress Dashboard, go to Plugins> Add New, search for “Bit Social,” then click Install and Activate the plugin.
Step 02: Connect your account
Next, connect the social media accounts where you want to publish your posts. Click the “Connect Account” button to start.
You will see two connection options:
- One-Click Connect: The fastest way to connect your account. Simply choose the platform and authorize it in one click.
- Custom App: Requires a few manual setup steps but gives you more control over the connection settings.
Select the connection method that works best for you and connect your accounts. Once the connection is complete, all your social media accounts will appear in the “Accounts” tab.
Step 03: Connect the OpenAI with the API
Go to the AI Prompt section from your dashboard. Next to OpenAI, click the “Connect” button to start the setup.
A pop-up window will appear asking for your OpenAI API key. Simply copy the API key from your OpenAI account, paste it into the field, and click Connect.
After a few seconds, Bit Social will confirm that OpenAI has been successfully connected, and you’ll be ready to generate AI-powered social media captions.
Note: AI Prompts are available in Bit Social Pro. You’ll also need an OpenAI API key with available credits.
Step 04: Create an AI Prompt
After clicking on the Create Prompt, a pop-up will appear with different options available
Enter a name for your prompt so you can easily identify it later. I have added the title for now, “Caption Generation.”
Choose what the AI will generate. There will be 2 options available
- Text – for captions, descriptions, or other written content
- Image – for generating images
From the Platform option, Select OpenAI as the platform to run the AI prompt
Choose the AI model you want to use. For example, GPT-4 for text generation or DALL·E-3 for images.
You can also adjust the Temperature setting to control creativity. A value around 0.7 usually works well for a balance between creativity and clarity, but you can change it later if needed.
If you selected Text, write the instruction you want the AI to follow. You can also use Smart Tags to automatically insert post information. For Example, “Create a catchy LinkedIn caption for this post: {post_title}, {post_content_short}.”
When the prompt runs, Bit Social will automatically replace the Smart Tags with real data from your post.
You can also use other tags like post content, excerpts, or WooCommerce tags such as product name, product description, and SKU to generate captions based on your product or post details.
Step 05: Assign the prompt to your Post Template
Once your AI prompts are ready, you have to add your prompt to your Post Template. Go to Bit Social → Templates. First, select the platform from where you want to post. On the left side, there are options like Facebook, LinkedIn, Instagram, and so on.
For using the AI prompt in the template, click the Prompt Tags button. You’ll see a list of all the prompts you created. Simply select the one you want, and it will be added to your template automatically.
Next, choose the posting type for your post. As you select a type, you will see a live preview on the right side that shows how your post will appear.
You can also enable the Trim Message option to automatically shorten the caption if it exceeds the platform’s character limit.
Step 06: Publish or Schedule with AI Prompts
After successfully assigning the AI prompt to your template, publish or schedule a post with Bit Social to see if this is working or not.
1) WP Auto Post
With WP Auto Post in Bit Social, sharing your content on social media becomes simple and automatic. When you publish a post on your WordPress site, Bit Social automatically shares it to your connected social media accounts, so you don’t have to post it manually on every platform.
If your template includes any AI Prompt, Bit Social first sends the prompt to the AI to generate a social media caption or image based on your post. Once the AI creates the content, it will automatically publish the post along with the generated caption to your selected social platforms.
2) WP Post Schedule
If you want to schedule social media posts with Bit Social, go to WP Post Schedule and click Create Schedule.
First, set the schedule time and choose the post filters to decide which WordPress posts you want to share. Then go to the Accounts and Template section, select the social media accounts you want to post to, and add your AI prompt to the template. You can also choose the media you want to include in the post.
Once everything is set, click Create, and Bit Social will automatically schedule and publish your posts to social media at the selected time.
Final Thoughts
Writing captions for every platform takes time, especially when you publish often and need to keep your messaging consistent. Scheduling tools help with publishing, but the writing itself can still slow you down.
That is why combining automation with AI works so well. AI helps you create captions faster, while automation helps you publish them at the right time. Together, they remove a large part of the repetitive work from your social media process.
With Bit Social, you can create AI prompts, generate captions from your post content, and publish or schedule everything directly from WordPress. It is a practical way to save time, stay consistent, and spend more energy on planning better content instead of rewriting captions for every post.
FAQs
Can AI create different captions for each social media platform?
Yes. You need to create prompt for the specific platform, the AI generates a caption that fits that platform. It automatically adjusts the tone, length, and style based on the audience. For example, it may create a more casual caption for Instagram and a more professional one for LinkedIn, so your posts feel natural and relevant on every platform.
How does Smart Tag work in Bit Social?
Smart Tags work by automatically pulling information from your WordPress posts or WooCommerce products and inserting it into your template or AI prompt. For example, when you use a tag like {post_title}, Bit Social replaces it with the actual title of your post when the caption is generated. This way, the AI creates captions using real post details without you having to add them manually each time.
How can e-commerce businesses and WooCommerce stores use AI captions effectively?
E-commerce stores often post multiple products daily. AI-generated captions make it easy to create product descriptions, promotional posts, and seasonal campaigns automatically. Combined with scheduling tools, this improves consistency, engagement, and overall AI-driven ecommerce marketing.
How do WP Auto Post and WP Post Schedule work with AI captions?
WP Auto Post automatically shares your WordPress posts to social media with AI-generated captions when you publish them. With WP Post Schedule, you can plan posts, and Bit Social will generate the captions and publish them at the scheduled time automatically.