Do you want to get instant email notifications for PDF form submissions on your WordPress site?
You may want to know immediately when someone fills out a form on your website. Getting instant notifications for your WordPress form submissions is super important.So you can respond quickly and never miss a message.
Instant notifications could save you time and keep you in the loop without having to check your website constantly. By using Bit Form to create your forms and Bit Form Built-in SMTP to ensure email delivery, you can make sure these notifications reach you fast and reliably. and I’m here to show you how to set it up!
In this article, we also show you how to convert from entries to PDF. So that user will get a PDF attachment after submitting the form which will make your website more functional and professional.
In this article:
Why Do You Need Instant Email Notifications?
If you have a form (like a contact form or a product inquiry form) on your website where other people can send you their questions and requests then you must be searching for how to get notification that someone submitted a form WordPress! But what if you don’t receive the notification immediately and lose a possible customer or business client? Of course, you do not want that to happen. These are the lists that clearly show you why you should get a notification right then and there once someone fills out a form:
Fast Response Time: if you receive notifications immediately you can respond fast which will make your customers/users happy because they don’t have to wait long for their queries.
Never Miss a Single Submission: You will never lose form submissions. Suppose, someone wanted to buy something from you and you didn’t even know about it!
Track Engagement: For business owners, notifications help track how many people are trying to reach out to you with their inquiries. So that you can understand who is interested in your services or products.
Solve Problems Quickly: If someone faces any problem with your products or services they can easily ask for the solution. This enables you to take action fast and will increase your business reputation.
Now you understand the importance, it is time to learn how to receive these notifications from an advanced plugin such as Bit Form. We will also configure Bit Form SMTP so that our emails go to our inbox (not the spam folder)!!
Setting Up Instant Email Notifications with Bit Form
First, we will install Bit Form & Bit SMTP plugins. After activating the plugins we will create a Form and then we set up form notification. And finally, we will configure our SMTP host with Bit SMTP. Let’s do it!
Install & Activate the plugins
To get started you have to install Bit Form. To install a plugin go to your WordPress Dashboard> Plugin> Add New Plugin> search for “Bit Form”. Install & activate the plugins.
Create a Form in Bit Form
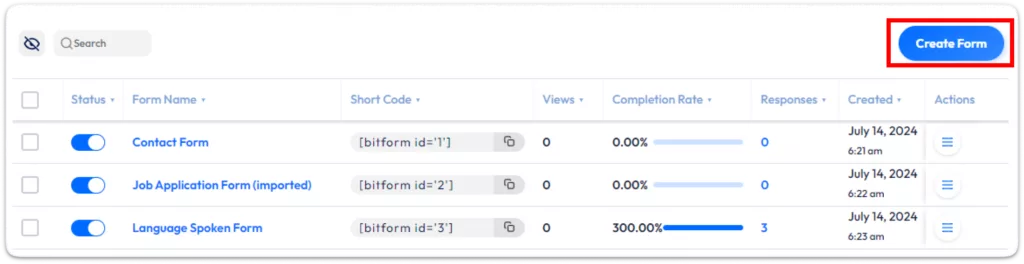
Next, let’s create a form. Bit Form makes this super easy! In your WordPress dashboard, go to Bit Form and click “Add New Form.” You can simply drag and drop fields like Name, Email, and Message to customize it as needed. Once you’re done, save the form. Now it’s ready, but we still need to set up instant notifications!
Go to Form Settings:
To configure instant notification navigate to Form Settings> Conditional Logics and Open the Show Success Message tab.
Turn On Email Notification
Find “Additional Actions” under Conditional Logic and enable “Email Notification.”
Configure Email Notification
Now we have to configure the email setting. In these steps, you have to choose an email template, form name, form mail, CC, BCC, reply to, and attachment or PDF attachment template. These will make your form more functional and keep you updated.
First, pick your email template. This is how the email looks. You have to choose an email template that you have made previously.
If you don’t have a pre-made email template you can build it easily by following some simple steps. To create new email templates navigate to Email Templates and click on the Add New Template.
After clicking on the Add New Templates button you will get all essentials option to make advanced email templates.
Add Template Name, Subject, and Body message. Add Filed to make your form more dynamic. You can also map all fields and use smart tag fields.
And now we have to set the “To” email (where the email will be sent). Set the “From” email (who the email is from) and the “From Name” (the name that shows up). You can pick an email from your form, choose a WordPress user email, or type in an email yourself. This will show in the “From” part of the email notification.
If needed, add CC or BCC to send copies to others. Set “Reply-To” Choose where replies should go.
Convert Form Entries to PDF – WordPress PDF Form Submissions
Need to Convert WordPress Form Submissions to PDF?
You can easily convert your WordPress form submissions to PDF and send a copy of the submission to the users. For this, you don’t need any WordPress PDF generator plugin if you use the Bit Form plugin. Bit Form offers easy PDF Form Submission to your mail.
Let’s set up this PDF submission. First, go to the PDF Templates from the form setting to create new PDF templates. Now click on the Add New Template button.
You will get all the options to set up the PDf templates. Here you can set how the submission will look on the PDF.
Give a name of the template and add text and fields to the template Body. You can add all the fields by clicking on the Map All fields. If we want all fields with tables click on the Map All fields With Table. Also, you can add Smart Tag Fields to make the PDF more dynamic.
If you would like to override the global PDF setting check the Override Global PDF Setting and configure it as per your requirements. You can also add a watermark on your PDF.
To see what is set on your Global PDF setting navigate to Bit Form Dashboard> App Setting> PDF.
Once you have done with it add the PDF template to your email notification setting.
N:B: Don’t forget to save or update your changes before exiting the form builder.
Configuring SMTP to Improve Mail Delivery
Now here’s something many people forget to do. Even if you set up notifications, your emails can still end up in the spam folder and then you would not see them at all.
This is where Bit Form SMTP comes to the rescue. Ensures your form notifications get delivered to your inbox properly.
To configure SMTP navigate to Bit Form Dashboard> App Settings> SMTP, you need the configuration information to configure SMTP:
SMTP Enable: Enable this so you can configure your email settings.
From Email Address: The address you want to use to send messages to recipients.
Form Name: Type a From Name, which is the name that you wish your recipients to see when they receive an email from you.
Reply-To Email address: Here you can place the email where people should reply to your emails.
SMTP Host: The address of the outgoing mail server you are using (e.g. smtp.gmail.com)
Type of Encryption: Choose an encryption method that is available on your server(SSL or TS).
SMTP Port: Select the port number for outgoing mail finer the SMTP server.
SMTP authentication: Set the authentication YES always.
SMTP Username & Password: Enter your username & password that you use to log into your mail server.
Just click on ‘Save Changes’ and your SMTP configuration is all set. You are now ready to test your SMTP settings and make sure they work!
To test the configuration navigate to App Settings> SMTP> Mail Test tab.
So, there you have it! By using Bit Form to create forms and using SMTP for reliable email delivery, you can keep your WordPress form submissions in order. You will now be immediately notified whenever someone submits your form, and as a result, respond promptly. On top of that, your notifications will never end up in the spam folder again when you use SMTP.
With the PDF attachment on the form submission email, you will get a standard way to show form submission entities which will make your site more professional!
Now go and set it up! Your website will appreciate it, and your customers will love how quickly you can accommodate their requests.
He writes about WordPress, SEO, automation, and SaaS with hands-on experience. He creates tutorials, comparisons, and practical content by understanding real use cases, search intent, and AI visibility.
Many WordPress users need to change their admin email for different reasons. Sometimes you lose access to your old email. Sometimes it gets hacked. And when that happens, you stop receiving important emails, like password reset links, security alerts, or update notifications. That can be a big problem. Another common reason is switching to a […]
WPForms Lite users often face a common problem. The free version does not store form entries in the dashboard. Instead, it only sends submissions by email. This means you cannot view or manage entries inside WordPress. This setup can quickly become frustrating. Important emails may land in spam or get lost. Without upgrading to Pro, […]
AI is changing how WordPress websites create content and automate daily tasks. But many website owners still struggle to connect powerful AI tools without paying extra or dealing with complex setups. While many creators are still stuck in the “copy-paste” loop with AI tools, WordPress Gemini Plugin is revolutionizing how websites use artificial intelligence to […]
Cookie Consent
We use cookies to improve your experience on our site. By using our site, you consent to cookies.
This website uses cookies
Websites store cookies to enhance functionality and personalise your experience. You can manage your preferences, but blocking some cookies may impact site performance and services.
Essential cookies enable basic functions and are necessary for the proper function of the website.
Name
Description
Duration
Cookie Preferences
This cookie is used to store the user's cookie consent preferences.
30 days
Cookie Preferences
This cookie is used to store the user's cookie consent preferences.
30 days
Cookie Preferences
This cookie is used to store the user's cookie consent preferences.
30 days
This cookie is set by Cloudflare to help manage bot traffic and protect the website from malicious activity. It does not collect or store any personal data and is used solely for security and performance purposes.
Used only with old Urchin versions of Google Analytics and not with GA.js. Was used to distinguish between new sessions and visits at the end of a session.
End of session (browser)
__utmz
Contains information about the traffic source or campaign that directed user to the website. The cookie is set when the GA.js javascript is loaded and updated when data is sent to the Google Anaytics server
6 months after last activity
__utmv
Contains custom information set by the web developer via the _setCustomVar method in Google Analytics. This cookie is updated every time new data is sent to the Google Analytics server.
2 years after last activity
__utmx
Used to determine whether a user is included in an A / B or Multivariate test.
18 months
_ga
ID used to identify users
2 years
_gali
Used by Google Analytics to determine which links on a page are being clicked
30 seconds
_ga_
ID used to identify users
2 years
_gid
ID used to identify users for 24 hours after last activity
24 hours
_gat
Used to monitor number of Google Analytics server requests when using Google Tag Manager
1 minute
__utmt
Used to monitor number of Google Analytics server requests
10 minutes
__utmb
Used to distinguish new sessions and visits. This cookie is set when the GA.js javascript library is loaded and there is no existing __utmb cookie. The cookie is updated every time data is sent to the Google Analytics server.
30 minutes after last activity
_gac_
Contains information related to marketing campaigns of the user. These are shared with Google AdWords / Google Ads when the Google Ads and Google Analytics accounts are linked together.
90 days
__utma
ID used to identify users and sessions
2 years after last activity
Clarity is a web analytics service that tracks and reports website traffic.