The best way to keep in touch with your audience and get regular visitors to your website is to build an active email list. You can easily do it with Mailchimp by following some simple steps, you will have to add its signup form to your WordPress site. Mailchimp is one of the simplest and most effective email marketing tools and with WordPress, you will get the highest flexibility to make it look good at any place on your website.
This guide will show you how to easily add a Mailchimp signup form to your WordPress site. You’ll learn how to select the right plugin and design an attractive form. We’ll also provide tips to make your form look great, helping you grow your subscriber list.
Table of Contents
What is Mailchimp and Why Do You Need It?
Mailchimp helps businesses keep track of their mailing lists and plan campaigns that are likely to get new users and convert them into loyal customers. Mailchimp is good for business use because it has rich features that make email marketing work better.
When you’re capturing email addresses via forms on your website, Mailchimp keeps these potential buyers neatly organized, nurtured, and converted by communicating effectively.
Using the Mailchimp signup form on your WordPress site can help your company grow and keep people interested over time. It can assist you in the following ways:
Simplified Audience Growth: A Mailchimp sign-up form enables your visitors to subscribe to your website and build a strong email list. This list grows as an asset for sharing updates, promotions, and content that nurtures loyal customers.
Improve Customer Engagement: Email marketing remains an excellent way for companies to be noticed. Because more than 4 billion people use email every day, the audience could be very large. It’s worth mentioning that 64% of small businesses connect with their buyers through email marketing.
High Return on Investment (ROI): Email marketing has a good ROI. According to the report by “The Direct Marketing Association (UK) Ltd 2019,” one is bound to get returns of around $40 for every dollar invested. This makes it the most cost-effective way to sell.
Personalized Communication: With Mailchimp, you can divide your email list into groups based on how subscribers act and what they like. This lets you send more relevant messages, which may increase the number of people who connect with them. Up to 760% more money can be made with personalized texts.
Automation and Efficiency: You can set up email programs to run automatically with Mailchimp. For example, you can send welcome emails to new subscribers or follow-up emails after a sale. This system saves time and makes sure that you always talk to your audience.
Detailed Analytics: Mailchimp provides you with complete analytics that let you track open rates, click-through rates, and all the other important data. The approach is fact-based and improves your marketing plans.
Compliance and Deliverability: Even open and click-through rates can be tracked, along with much other useful data, by using complete analytics in Mailchimp.
Finally, adding a Mailchimp signup form to your WordPress site makes it easier to build and manage your email list. It also helps get the most out of email marketing for the success of your business in the long run.
What is Bit Form and How Does It Integrate with Mailchimp?
Bit Form is a user-friendly advanced form builder designed for WordPress users to easily create forms within a few minutes. From basic contact forms to more advanced multi-step forms with just a simple drag-and-drop feature, you can build everything as per your needs. The clean interface of Bit Form ensures that even beginners can smoothly navigate and use its functionality without any hassle. Bit Form has some most unique and useful features like the repeater field, signature field, date and time field, payment field, draft button, form abandonment, sending email notifications on form submission, spam protections, built-in SMTP, and many more.
You can connect Bit Form with Mailchimp to send form submissions to your Mailchimp list. Use this feature in your email marketing plan, and your base of subscribers will grow steadily over time. It will be much easier to collect leads, saving you time and ensuring that no essential leads are missed. Bit Form is also integrated with 47+ common tools like Google Sheets, WooCommerce, CRM and email marketing tools, and many more.
How to Create a Mailchimp Signup Form in WordPress
We will complete the integrations in two parts. First, we will install the form and create the signup form. And then we will integrate the form with Mailchimp. So let’s get started!
Step-01: Create a Signup Form with Bit Form
1. Install and Activate the Bit Form Plugin
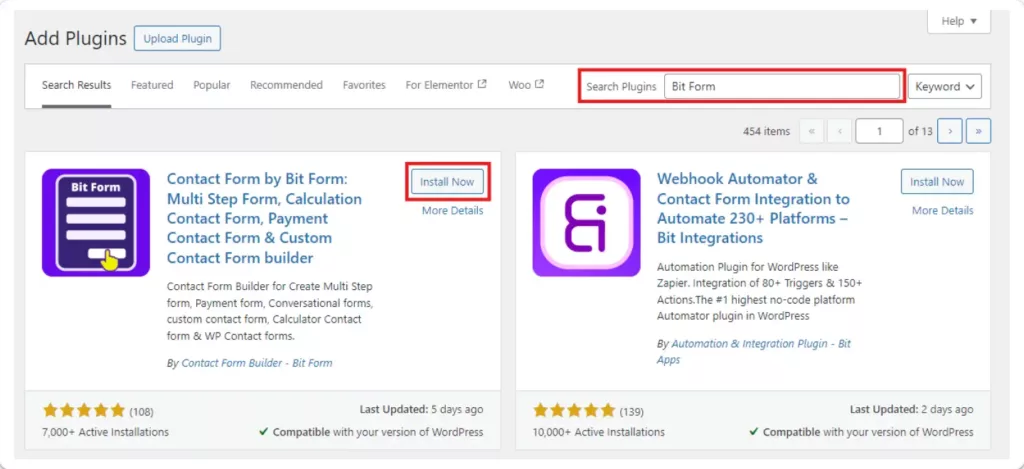
To install the Bit Form plugin, log in to your WordPress dashboard. Go to Plugins and click Add New. Search for “Bit Form” and when you find it, click Install Now. Once it’s installed, click Activate to use the plugin.
2. Create a New Form
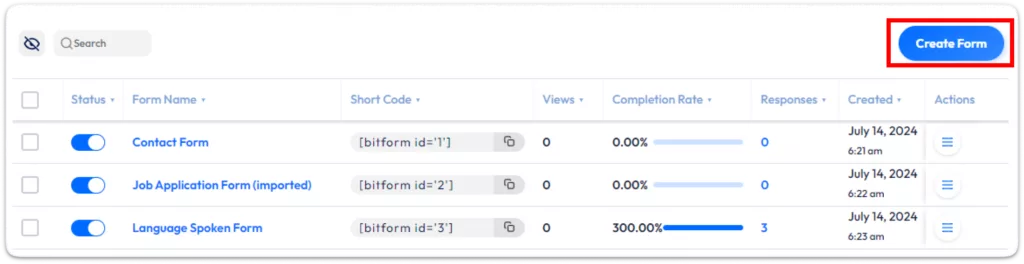
In your WordPress dashboard, go to Bit Form and click on Create Form.
You can choose a prebuilt template to start with or create a form from scratch. In this form, I will use the Newsletter Form (Atlassian Theme) template for a quick start.
3. Customize Your Signup Form
Using the drag-and-drop editor in Bit Form, you can easily add fields such as Name, Email, or any other information that you want to collect. Customize and style every single field: edit labels, add placeholder text, and make certain fields required to make your form look very professional.
4. Publish the Form
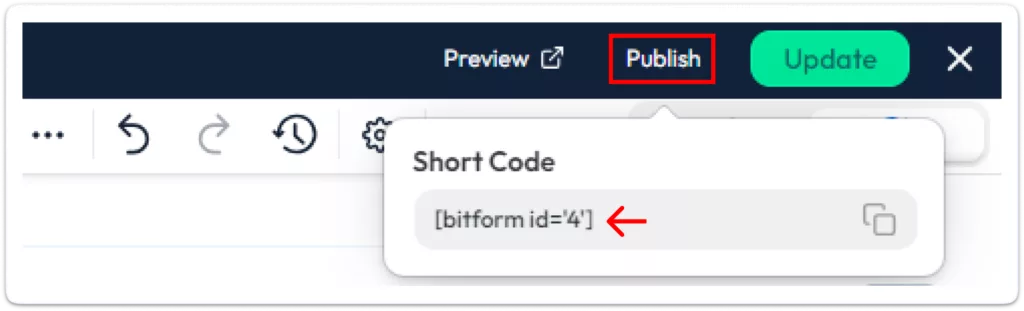
When you’re finished designing, hit Publish. You will get a shortcode that you can copy and paste into any page or post where you want the signup form to appear.
Step-02: Integrate the Form with Mailchimp
In this step, we will integrate the form with Mailchimp. Integrating Mailchimp with Bit Form is super easy and don’t need any coding knowledge for this configuration. Just follow these simple steps and you will able to configure it easily.
Quick view of the steps to integrate Mailchimp with BitForm
Set Up Mailchimp Integration in Bit Form
From your Bit Form dashboard, navigate to Settings > Integrations tab.
And then click on the plus icon to add new integrations to your form. You will see the integrations list here. Find out Mailchimp or search for it. Now click on the Mailchimp.
After clicking on Mailchimp you will asked for Mailchimp Client ID and Client Secret. Also, you will get the Authorized Redirect URLs here, you will need this to create the app on Mailchimp.
Generate Mailchimp Client ID and Client Secret
Log in to your Mailchimp account and navigate to Integrations. Click on the Register an App.
Fill in the required details. You will see the Homepage URL and Authorized Redirect URIs from Bit Form’s integration page. Copy the Redirect URL and paste it to the specific field. Click Create to register the app and retrieve your Client ID and Client Secret.
After hitting the Create button you will get the Client ID and Client Secret. Copy them and paste them on the Bit Form integrations.
And then click on the authorized button.
It will redirect you to the Mailchimp login page. Now login with your Mailchimp credentials and Allow access.
After successful authorization, you will be redirected to the Bit Form integration page. Now click on the Next button.
Configure Audience and Tags
Select a Mailchimp audience from the dropdown menu (make sure it’s already created in Mailchimp). Optionally, add tags to organize your subscribers effectively.
Use the Map Fields option to connect form fields in Bit Form to Mailchimp fields. Add more fields if needed by clicking the Plus (+) icon.
Enable Advanced Actions (Optional)
Address Field: Add subscriber addresses (e.g., Address, City, Zip, State).
Double Opt-In: Require user confirmation before subscription.
Update Mailchimp: Update existing records if new data is submitted for the same email.
Save and Finish
Click Save & Finish to complete the setup.
Set Conditional Logic (Optional)
In the Conditional Logic section, set up rules to trigger the integration automatically. Choose Mailchimp API as the integration action and save the condition.
Check the Response section in Bit Form to view logs and ensure your integration is working properly. Logs will show the status of each action, helping you troubleshoot any issues. To check this navigate to Bit Form Dashboard>Entries and Click on the response.
Now let’s check the Mailchimp contacts. Here the subscriber mail is successfully added to the Mailchimp contact list!
Thats all. Now your form is connected with your Mailchimp account!
Conclusion
Bit Form makes it easier than ever to create a Mailchimp signup form in WordPress. You can easily automate your email list-building process thanks to its user-friendly UI and highly functional Mailchimp connection. There’s no reason to wait, as Mailchimp can increase revenue by as much as 29%.
Bit Form is the ideal plugin for you if you’re prepared to advance your marketing. Its integration with Mailchimp will guarantee accuracy, save you time, and facilitate your business growth. Get Bit Form now to begin creating the email list of your dreams! Your potential clients are waiting.
He writes about WordPress, SEO, automation, and SaaS with hands-on experience. He creates tutorials, comparisons, and practical content by understanding real use cases, search intent, and AI visibility.
Many WordPress users need to change their admin email for different reasons. Sometimes you lose access to your old email. Sometimes it gets hacked. And when that happens, you stop receiving important emails, like password reset links, security alerts, or update notifications. That can be a big problem. Another common reason is switching to a […]
WPForms Lite users often face a common problem. The free version does not store form entries in the dashboard. Instead, it only sends submissions by email. This means you cannot view or manage entries inside WordPress. This setup can quickly become frustrating. Important emails may land in spam or get lost. Without upgrading to Pro, […]
AI is changing how WordPress websites create content and automate daily tasks. But many website owners still struggle to connect powerful AI tools without paying extra or dealing with complex setups. While many creators are still stuck in the “copy-paste” loop with AI tools, WordPress Gemini Plugin is revolutionizing how websites use artificial intelligence to […]
Cookie Consent
We use cookies to improve your experience on our site. By using our site, you consent to cookies.
This website uses cookies
Websites store cookies to enhance functionality and personalise your experience. You can manage your preferences, but blocking some cookies may impact site performance and services.
Essential cookies enable basic functions and are necessary for the proper function of the website.
Name
Description
Duration
Cookie Preferences
This cookie is used to store the user's cookie consent preferences.
30 days
Cookie Preferences
This cookie is used to store the user's cookie consent preferences.
30 days
Cookie Preferences
This cookie is used to store the user's cookie consent preferences.
30 days
This cookie is set by Cloudflare to help manage bot traffic and protect the website from malicious activity. It does not collect or store any personal data and is used solely for security and performance purposes.
Used to monitor number of Google Analytics server requests
10 minutes
__utmb
Used to distinguish new sessions and visits. This cookie is set when the GA.js javascript library is loaded and there is no existing __utmb cookie. The cookie is updated every time data is sent to the Google Analytics server.
30 minutes after last activity
__utmc
Used only with old Urchin versions of Google Analytics and not with GA.js. Was used to distinguish between new sessions and visits at the end of a session.
End of session (browser)
__utmz
Contains information about the traffic source or campaign that directed user to the website. The cookie is set when the GA.js javascript is loaded and updated when data is sent to the Google Anaytics server
6 months after last activity
__utmv
Contains custom information set by the web developer via the _setCustomVar method in Google Analytics. This cookie is updated every time new data is sent to the Google Analytics server.
2 years after last activity
__utmx
Used to determine whether a user is included in an A / B or Multivariate test.
18 months
_ga
ID used to identify users
2 years
_gali
Used by Google Analytics to determine which links on a page are being clicked
30 seconds
_ga_
ID used to identify users
2 years
_gid
ID used to identify users for 24 hours after last activity
24 hours
_gat
Used to monitor number of Google Analytics server requests when using Google Tag Manager
1 minute
_gac_
Contains information related to marketing campaigns of the user. These are shared with Google AdWords / Google Ads when the Google Ads and Google Analytics accounts are linked together.
90 days
__utma
ID used to identify users and sessions
2 years after last activity
Clarity is a web analytics service that tracks and reports website traffic.