Do you want to customize and style your WordPress forms easily?
Don’t worry! with Bit Form Advance WordPress form builder, you can change the look of your forms to match your brand style without any coding.
Whether you need to adjust the font size, change the colors, or update the layout, Bit Form makes it simple and beginner-friendly. WordPress form styling will Improve your site’s appearance and user experience.
By styling the form, you will get a modern-looking form that matches your brand style. This article will guide you through styling a form with Bit Form customization features.
Why Customize and Style Your WordPress Forms?
When you create a form it gives a basic and as-usual look. By doing some easy customization you can change the look of your form.
Customizing and styling your WordPress forms makes it look better and easier to use. When your forms match your brand’s colors and style, the form gets a professional vibe. Better-looking forms in WordPress invite more people to fill them out and increase your results.
You can add cool features like multi-step forms, payment forms, conversational forms, and calculation forms making them more functional. Custom forms in WordPress enable you to collect essential information while reducing spam. Furthermore, they ensure accessibility for all users, Ensuring user-friendliness for all.
How to Customize and Style Your WordPress Forms With Bit Form
It’s super easy to style your Bit Form style. Just follow these simple steps-
1. Install Bit Form – Best WordPress Form Builder Plugin
First, you need to install and activate the Bit Form plugin. Then navigate to your WordPress dashboard and select Plugins > Add New. In the search bar, type “Bit Form.” Click Install Now, then Activate the plugin. You can also follow this plugin installation guideline.
2. Create a New Form
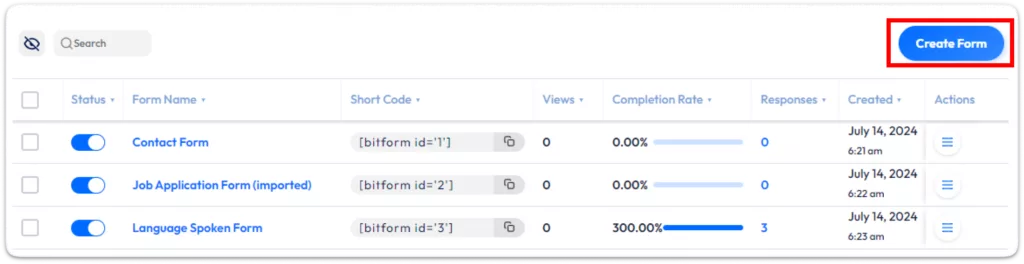
Create Form: In the dashboard, go to Bit Form. Click Add New Form. Start with a blank form or use a template.
Add Fields: Drag and drop fields like text, email, number, etc., into your form.
3. Theme Customization
Bit Form Advance WordPress form builder plugin provides three theme options for you to choose from. No matter if you love a minimalist vibe, a modern design, or a classic touch, Pick the one that fits your style to customize your interface and make your experience more enjoyable.
No Style: This theme includes only the basic structure for the fields without any extra styles. It’s perfect for users who want to customize the look of the forms with their styles or for those who want the forms to match the styles of the page’s theme.
To apply the No Style theme, navigate to Theme > Apply theme.
Bit Form Default: This theme is an updated version of the original, with extensive customizations to make your form look more attractive right away.
To apply the Bit Form Default theme, go to Theme > Apply theme.
Atlassian Theme: A polished, professional theme inspired by the Atlassian design system.
To apply the Atlassian theme, head to Theme > Apply theme.
You can customize various elements of your selected theme to align with your branding color and style.
4. Customize Common Elements
You can easily access elements and layers using three simple methods. First, pick a field and click on the style option in the top right corner.
Next, click the “Elements & Layers” button in the panel’s header. Finally, if you want to pick specific field options, click the “Inspect Elements” button up there in the header, too!
Quick Tweaks: Let’s make it easy! You can quickly set default forms styles for important stuff like Font Color, Background Colors, Font Family, Font Size, and even Right-to-Left (RTL) text orientation, so your WordPress form design has a consistent look throughout.
Form Wrapper: The Form Wrapper helps keep everything looking good together. You can customize the Background Color, Border thickness, and style, add some Box Shadow for depth, and tweak the Margin and Padding for that just-right spacing. Don’t forget to play with the Outline for Transition effects for smoother interactions!
Field Containers: Make your containers stand out. You can easily adjust the Background Color, pick a cool Border style, and add Shadow effects for a 3D look. Plus, proper Spacing will make it all feel organized and user-friendly.
Labels and Subtitles: You can style labels and subtitles easily. Adjust the Background Color for better visibility, add Borders for definition, and use Shadow for depth. You can also change the Font Size, Style, and Weight to make them pop, along with Text Color for easy reading and Spacing for clarity.
Inputs: Let’s make those input fields welcoming! Customize the Background Color for a cozy feel, set a Border, and provide some Spacing to keep everything positioned nicely and easily accessible.
Helper Texts and Error Messages: The user should get the proper information about the field and error so that they can easily understand the process.
You can customize these messages by changing the Background Color to make them stand out, choosing a clear Border style, and adding Shadow for emphasis. Adjust the Font Size, Style, and Weight to ensure they’re noticeable, and don’t forget about Text Color for good contrast and Spacing for a neat layout.
You’ll see error messages like this.
Buttons: Buttons are where the action happens! Make them eye-catching by adjusting the Background Color, choosing a stylish Border, and adding Shadow for a tactile feel. Adjust the Font Size for readability, and use Font Style and Weight for consistency and emphasis. Finally, make sure the Text Color contrasts well and the Spacing makes them engaging.
5. Customize Individual Elements
Individual Elements: Customizing each field is critical to achieving a design that fits your needs, so let’s dive in!
Quick Adjustments: With just a few clicks, you can easily change the Accent Color to match your branding, Match Backgrounds for a more engaging user experience, adjust the Field Size for better accessibility, and change the Border Radius to get the perfect shape and softness for your input fields.
Field Container: In the Bit Form WordPress form builder plugin, the Field Container style settings allow you to customize the appearance of each field and override global form styles. To start with custom form styles, select the field you want to change, enable the Override form theme styles option, choose a style type (like Default or Hover), add CSS properties, and use custom classes for additional styling options!
Label and Input: Want complete control over how your Labels and Inputs look? Just activate the “Override form theme styles” feature! You can use specific CSS properties to make these elements reflect your brand and enhance user interaction.
Error Messages: Make your error messages visible with some custom form styles! This helps users spot issues quickly and ensures those messages fit seamlessly into your overall design.
Custom Classes and Attributes: Adding custom classes and attributes can improve the style and functionality of your form elements. This allows for more intricate designs and better user engagement, leading to a smoother experience for everyone.
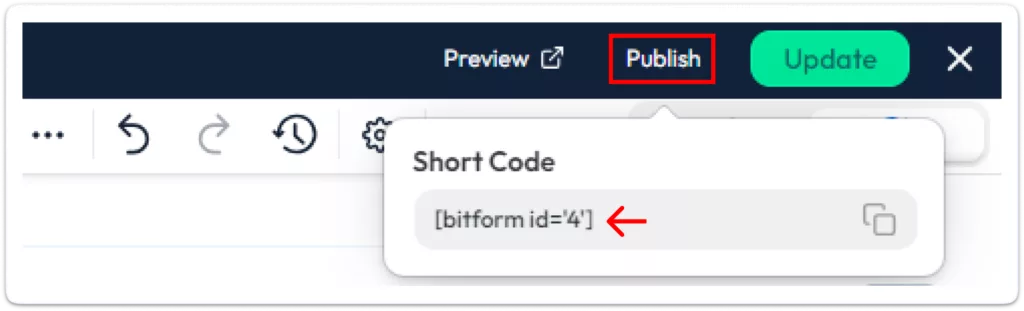
6. Publish the Form
Copy the shortcode by clicking on the Publish button and paste it into a page or post where you want to show the form.
Following these simple steps, you can easily create, customize, and style forms on your WordPress site using Bit Form.
Hey Users Here are Special Tips For You
Keep the form simple and clean so it’s easy to fill out.
Use reCAPTCHA to keep out spam submissions.
Check that there’s enough color contrast for readability.
Avoid using decorative fonts, as they can be difficult to read.
Make sure to test how it looks on all devices.
If needed, consider using a multi-step form format or conditional logic.
Conclusion
Customizing and styling your WordPress forms with Bit Form is a game-changer to improve your website’s visibility. It helps you achieve a modern, professional look that grabs users’ attention.
This look will make you feel proud and accomplished, knowing that your website is presenting itself in the best possible way. Plus, well-designed forms improve the overall user experience and accessibility, making it easy for everyone to interact with your site.
Let’s remember Bit Form’s cool features, like multi-step forms in WordPress, payment integrations, and conversational forms. This means your forms can be both eye-catching and super functional. So take advantage of Bit Form’s capabilities to create custom forms that stand out and better serve your audience! Also, you can build a modern WordPress contact form with Bit Form’s advanced contact form builder.
Bonus
Bit Form’s best WordPress form builder plugin works with over 47+ integrations, making your lead generation and customer management a breeze. It saves you time and effort, so you can be more efficient! Ready to upgrade your WordPress form design experience? Get Bit Form today and take it to the next level! For more details, join the Bit Form Facebook Community for tips and advice from fellow users and developers. Need help? Reach out via email or live chat for quick support.
Frequently Asked Questions
What Are the Best WordPress Plugins for Styling Forms?
Many excellent plugins for styling WordPress forms exist, and Bit Form is among the best. It features visual builders and customization options that allow you to adjust the form’s appearance without any coding skills.
Is Coding Knowledge Required to Customize Forms with Bit Form?
You don’t need coding skills to customize forms with Bit Form!
How Do I Create a Multi-Step Form with Bit Form?
Creating multi-step forms is a breeze with Bit Form! Its built-in feature lets you design multiple steps, and you can style each one differently using the style editor.
Can I Use Custom CSS to Style My Bit Form?
Absolutely! You can easily add custom CSS to style your Bit Form. Remember to use the specific classes and IDs from Bit Form to target the elements effectively!
How Do I Style the Submit Button in a Bit Form?
The Bit Form style editor offers many options for customizing your submit button. You can change its background color, text color, font, border, and size, and even add cool hover effects to make it pop!
Can I Add Custom Fonts to My Bit Form?
Yes, you can bring in custom fonts for your Bit Form! Just upload the font files, and then use the style editor to apply your chosen font to the form elements.
He writes about WordPress, SEO, automation, and SaaS with hands-on experience. He creates tutorials, comparisons, and practical content by understanding real use cases, search intent, and AI visibility.
Many WordPress users need to change their admin email for different reasons. Sometimes you lose access to your old email. Sometimes it gets hacked. And when that happens, you stop receiving important emails, like password reset links, security alerts, or update notifications. That can be a big problem. Another common reason is switching to a […]
WPForms Lite users often face a common problem. The free version does not store form entries in the dashboard. Instead, it only sends submissions by email. This means you cannot view or manage entries inside WordPress. This setup can quickly become frustrating. Important emails may land in spam or get lost. Without upgrading to Pro, […]
AI is changing how WordPress websites create content and automate daily tasks. But many website owners still struggle to connect powerful AI tools without paying extra or dealing with complex setups. While many creators are still stuck in the “copy-paste” loop with AI tools, WordPress Gemini Plugin is revolutionizing how websites use artificial intelligence to […]
Cookie Consent
We use cookies to improve your experience on our site. By using our site, you consent to cookies.
This website uses cookies
Websites store cookies to enhance functionality and personalise your experience. You can manage your preferences, but blocking some cookies may impact site performance and services.
Essential cookies enable basic functions and are necessary for the proper function of the website.
Name
Description
Duration
Cookie Preferences
This cookie is used to store the user's cookie consent preferences.
30 days
Cookie Preferences
This cookie is used to store the user's cookie consent preferences.
30 days
Cookie Preferences
This cookie is used to store the user's cookie consent preferences.
30 days
This cookie is set by Cloudflare to help manage bot traffic and protect the website from malicious activity. It does not collect or store any personal data and is used solely for security and performance purposes.
Used to monitor number of Google Analytics server requests
10 minutes
__utmb
Used to distinguish new sessions and visits. This cookie is set when the GA.js javascript library is loaded and there is no existing __utmb cookie. The cookie is updated every time data is sent to the Google Analytics server.
30 minutes after last activity
__utmc
Used only with old Urchin versions of Google Analytics and not with GA.js. Was used to distinguish between new sessions and visits at the end of a session.
End of session (browser)
__utmz
Contains information about the traffic source or campaign that directed user to the website. The cookie is set when the GA.js javascript is loaded and updated when data is sent to the Google Anaytics server
6 months after last activity
__utmv
Contains custom information set by the web developer via the _setCustomVar method in Google Analytics. This cookie is updated every time new data is sent to the Google Analytics server.
2 years after last activity
__utmx
Used to determine whether a user is included in an A / B or Multivariate test.
18 months
_ga
ID used to identify users
2 years
_gali
Used by Google Analytics to determine which links on a page are being clicked
30 seconds
_ga_
ID used to identify users
2 years
_gid
ID used to identify users for 24 hours after last activity
24 hours
_gat
Used to monitor number of Google Analytics server requests when using Google Tag Manager
1 minute
_gac_
Contains information related to marketing campaigns of the user. These are shared with Google AdWords / Google Ads when the Google Ads and Google Analytics accounts are linked together.
90 days
__utma
ID used to identify users and sessions
2 years after last activity
Clarity is a web analytics service that tracks and reports website traffic.