Adding a payment option to WordPress is essential for facilitating online transactions, increasing revenue, and providing a seamless and professional experience for your customers. It’s a critical component for any online business or website looking to monetize its products or services.
However, it’s a very simple process to create a WordPress payment form with multiple payment options like PayPal, RazorPay, Stripe, and Mollie applying conditional logic. You have to follow just three simple steps. Before applying these 3 steps, you have to install a Form builder plugin in WordPress to create an advanced payment form.
Configure payment method
Create your form and customize it.
And apply conditional logic
Table of Contents
Why add a payment option to WordPress
Adding a payment option to a WordPress website is important for several reasons, especially if you run an online business or e-commerce store. Here are some key reasons why adding a payment option to WordPress is important:
E-commerce: If you’re selling products or services online, you need a way to accept payments from customers. A payment option allows you to securely process transactions, which is essential for conducting business on the Internet.
Convenience: Offering a payment option on your WordPress site makes it convenient for your customers to make purchases without leaving your website. This can lead to higher conversion rates, as customers are less likely to abandon their shopping carts.
Professionalism: Having a payment option on your website adds to the professionalism of your online business. It reassures customers that you are a legitimate and trustworthy seller.
Expanded Customer Base: By accepting online payments, you can reach a global audience. Customers from anywhere in the world can purchase your products or services, which can significantly expand your customer base.
Improved User Experience: Integrating a seamless payment option can enhance the overall user experience on your website. Customers can quickly and easily complete transactions, leading to higher customer satisfaction.
Revenue Generation: Adding a payment option is crucial for generating revenue from your website. It allows you to monetize your products, services, or content, leading to potential profitability.
Donations and Fundraising: For nonprofit organizations, bloggers, or content creators, accepting donations through a payment option can be a primary source of funding.
Security: WordPress offers various payment plugins and integrations that are designed to be secure and compliant with industry standards. This ensures the protection of both your business and your customers’ sensitive information.
Analytics and Reporting: Many payment solutions provide detailed analytics and reporting tools that can help you track sales, customer behavior, and other important metrics, allowing you to make informed business decisions.
How to create a WordPress payment form
Let’s go to the direct action point on how to create a WordPress payment form.
Step 1: Configure payment method
First, You have to integrate all available payment methods before making a payment form on your WordPress site. Payment gateway configuration and integration with Bit Form Pro are quite simple. Bit Form is the most advanced and lightweight form builder plugin. If you want to learn more about Bit Form, you may read this one.
You will see a page like the below one. Click on App Setting
On the left side, you will now see many options. Click payment, then the “+” icon.
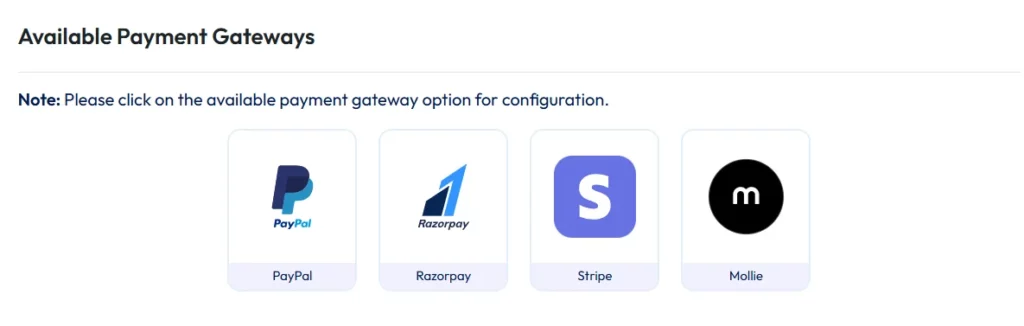
A screen with three payment options will show up when you click the “+” icon. These methods of payment must be configured before using these payment options in Form Builder.
To configure them, only need to click on these payment options and input your API secret and key, which are located in your own or clients’ PayPal and Razorpay accounts. All you have to do is copy the API secret and key from PayPal and Razorpay accounts and then paste them here to accomplish the configuration. Now you are prepared to add these payment options to your payment form.
Step 2: Create Form and Customize it
Now click on the “Create Form” button→Blank→Builder, and write your form name at the corner of the left side.
On the left, there’s a search bar with a 40+ field. Anything is possible to add, including a file upload field, a drop-down menu, an email form, a contact number field, and much more. Now include a “Radio Button” field. We will add two payment options to the radio button. you may add all payment options if you want. However, by selecting this radio button, you can modify the field settings on your right side. You can change the label’s name, icon, and payment methods here, among other things. Under the theme customization section, you have the option to change label color, background color, font color, and size.
Next, select “Add/Edit Options” and add all three payment options or you can add any two payment options. Here, I am adding only two payment options by applying conditional logic. Now the question is why should you use a radio box and conditional logic here? When your users come to fill up this form they will click only one option at a time, for example, if users choose PayPal, only the PayPal gateway will be shown and the rest options will be hidden. To make it, you have to apply conditional logic here. If you feel a bit complex, just wait and read it patiently. After reading through it all, I promise it will be simpler for you.
From the field area, you must now drag and drop each built-in payment gateway field that we configured earlier. Now just drag any two payment options and apply condional logic. To apply conditions, you must now hide every gateway as you don’t want to show even a single gateway until users click on payment options. Let’s get going.
Well, you can change the label name of your radio box, for example, here I wrote “Choose Payment” in the label name. Now go “back to the field list”. Here you will see these hidden fields. You have to click on both for setting fixed or dynamic shipping amount and Tax. If you choose a fixed option put some amount according to your requirements.
Step 3: Apply conditional logic
Now go to the settings option
Here you will see a page with so many options. Click on the “Conditional Logics” option and then click on “Only on Field Input”. Below this one, there is a condition option you can see. This is the field where you have to put conditions. You can apply any easy-to-advance conditions using the Bit Form Pro and Bit Form Plus.
Now here you can see the “If condition”. You have to put a condition here. Condition: If→ Choose Payment field→is equal→PayPal, Then PayPal→Show, Razorpay→Hide. That means when the user selects PayPal then Razorpay will automatically hide from the Form.
Upon selecting Razorpay, PayPal will now automatically disappear from your form. You must provide a comparable condition in the “Else If” box to apply this condition., you have to put a similar condition in the “Else If” option. Condition is like- Else If→Choose Payment field →is equal→ Razorpay. Then Razorpay →Show, PayPal →Hide. That’s it you are all set. Now click on the update button and then publish it. so easy to set conditional logic with bit Form. Now the question is how you will add this form to your WordPress site or any specific page.
How to add a payment form in WordPress
After clicking on the publishing button you will see a short code, just copy this code and go to the WordPress dashboard. Then go to the page where you want to put this form and paste this code here. Once you have updated or published your WordPress page, the payment form will appear on the page.
Now this Advanced payment form is available, your users may transfer money. If your form is a little lengthier, try to create a multi-step form and place the payment step at the very end. Your user will find it simpler to fill out this form and utilize it to transfer payment.
Action: Copy shortcode→go to the WordPress dashboard→page→paste it to the page where you want to put this form→click on the update or publish button of the page.
Related questions you may ask
How do I choose the right payment gateway for my site?
Consider factors like transaction fees, supported countries, ease of integration, security, and compatibility with your business needs. Research and read reviews to make an informed decision.
Can I accept payments without an SSL certificate?
No, it’s highly recommended to have an SSL certificate (HTTPS) on your website for security. Most payment gateways require it to encrypt sensitive customer data during transactions.
Do I need a business bank account to accept payments online?
It’s advisable to have a business bank account for separating personal and business finances. Some payment gateways may require it for verification.
How can I test payment processing on my site without making real transactions?
Here including all payment gateways provide sandbox or test environments. You can use these to simulate transactions without actual money changing hands, ensuring everything works correctly.
Why do customers encounter payment errors during checkout?
Payment errors can occur due to various reasons, such as incorrect card details, insufficient funds, or issues with the payment gateway. Ensure your customers receive clear error messages for troubleshooting.
What should I do if I face problems during the payment integration process?
How do I set up recurring payments or subscription billing on my site?
If you want to offer subscription services, use plugins like WooCommerce Subscriptions or a payment gateway that supports recurring billing. Configure the settings and pricing accordingly.
As 2025 comes to a close, it’s time to reflect on an incredible year at Bit Apps. This year wasn’t just about launching new features; it was about truly listening to our users, evolving our products, and delivering powerful solutions that help businesses grow. From Bit Form making form-building smarter to Bit Flows revolutionizing automation […]
Dear WordPress enthusiasts! What an unforgettable experience it was! WordCamp Dhaka 2025 is over, and wow, what an amazing event it was! From beginning to end, the energy, excitement, and community spirit were truly awesome. Bit Apps was proud to be part of this grand event as the Lalbagh Legacy (Platinum) Sponsor of WordCamp Dhaka […]
Black Friday 2025 is finally here, and it’s the best time to give your WordPress website the upgrade it deserves with huge discounts! If you’ve been thinking about improving your site’s design, automating tasks, or adding more functionality, this is the perfect opportunity. This Black Friday, you can grab amazing deals on the best plugins, themes, and automation […]
Cookie Consent
We use cookies to improve your experience on our site. By using our site, you consent to cookies.
This website uses cookies
Websites store cookies to enhance functionality and personalise your experience. You can manage your preferences, but blocking some cookies may impact site performance and services.
Essential cookies enable basic functions and are necessary for the proper function of the website.
Name
Description
Duration
Cookie Preferences
This cookie is used to store the user's cookie consent preferences.
30 days
Cookie Preferences
This cookie is used to store the user's cookie consent preferences.
30 days
Cookie Preferences
This cookie is used to store the user's cookie consent preferences.
30 days
This cookie is set by Cloudflare to help manage bot traffic and protect the website from malicious activity. It does not collect or store any personal data and is used solely for security and performance purposes.
Used to monitor number of Google Analytics server requests
10 minutes
__utmb
Used to distinguish new sessions and visits. This cookie is set when the GA.js javascript library is loaded and there is no existing __utmb cookie. The cookie is updated every time data is sent to the Google Analytics server.
30 minutes after last activity
__utmc
Used only with old Urchin versions of Google Analytics and not with GA.js. Was used to distinguish between new sessions and visits at the end of a session.
End of session (browser)
__utmz
Contains information about the traffic source or campaign that directed user to the website. The cookie is set when the GA.js javascript is loaded and updated when data is sent to the Google Anaytics server
6 months after last activity
__utmv
Contains custom information set by the web developer via the _setCustomVar method in Google Analytics. This cookie is updated every time new data is sent to the Google Analytics server.
2 years after last activity
__utmx
Used to determine whether a user is included in an A / B or Multivariate test.
18 months
_ga
ID used to identify users
2 years
_gali
Used by Google Analytics to determine which links on a page are being clicked
30 seconds
_ga_
ID used to identify users
2 years
_gid
ID used to identify users for 24 hours after last activity
24 hours
_gat
Used to monitor number of Google Analytics server requests when using Google Tag Manager
1 minute
_gac_
Contains information related to marketing campaigns of the user. These are shared with Google AdWords / Google Ads when the Google Ads and Google Analytics accounts are linked together.
90 days
__utma
ID used to identify users and sessions
2 years after last activity
Clarity is a web analytics service that tracks and reports website traffic.