Are you looking for the best and easiest solution to take online donations?
Raising funds or collecting donations is now easy and secure using a WordPress form builder, like Bit Form. You can collect a one-time or recurring donation within a single form.
This process is convenient for your non-profit organization, free services provider, influencer, or community. You can also collect funds for social work or to help people who are affected by a natural disaster.
In this article, I will show you how to create a fully functional and secure donation form in WordPress with payment gateways such as PayPal, Stripe, and more. Let’s get started!
Table of Contents
Best Way to Create an Online Donation Form in WordPress
If you search for wordpress donation plugin or an online donation form, you may get many solutions. But you have to decide on the best one that fits your needs and also helps you with data analysis.
Many people use Google Forms to take donations. Building a form with Google Forms is easy and simple. But the platform has no direct payment integrations and lacks advanced features. Also, it provides limited security features compared to other alternatives. There are many other solutions like JotForms, but it’s expensive.
If your organization already has a website on WordPress, you can easily collect payment with a WordPress form. This process is super easy and affordable.
Also, if you are not a WordPress user, you can easily create a site in WordPress. You just need a domain and hosting for your WordPress site, and you need to install WordPress on your server. You can do it yourself, or you can take help from any freelance marketplace like Fiverr or Upwork.
Why Choose WordPress to Create an Online Donation Form
As I mentioned before, there are many ways to collect online donations. But why choose WordPress? Let’s see what benefits you will get if you use WordPress to collect donations.
Easy to configure: WordPress is known for its simplicity and ease of use. Even if you are not a tech person, you can easily build and manage forms and other functionality. Also, WordPress is easy to access for everyone.
Hundreds of plugins: You will get tons of plugins for every single niche. Like for the form plugin, you will get Bit Form, WPForms, Fluent Forms, and many more. Having an alternative on one platform gives you more flexibility in the long run.
Customization flexibility: WordPress is highly customizable, so you can easily match your brand style and create your website and forms. There are many themes and a drag-and-drop page builder that allows you to customize your site easily.
Security: If you collect donations online, you must have a secure platform. Other ways people will not feel safe using their payment details on your platform. WordPress is super secure, and the form builder like Bit Form uses secure payment gateways such as PayPal, Stripe, and many more.
Large Community and Support: WordPress has a large community, and there are many forums to help you if you face any issues. Also, every plugin has its own community, and they also provide direct customer support. So whenever you need help to fix anything, you will get assistance instantly.
Affordability: Compared to all other alternatives for creating a donation form, WordPress will give you an affordable solution in the long run. If you already using WordPress, then it will be a super money-saving way for you.
Best Plugins to Create an Online Donation Form in WordPress
Though Bit Form is not a direct wordpress donation plugin, it is a form plugin. Using it, you can easily create a donation form on your wordpress site. In WordPress, you will get many form plugins to create an online donation form. But one of the clever choices would be using the Bit Form plugins. Using this form builder as your go-to WordPress donation plugin has the following advantages.
Highly Customizable & Easy to Use: This WordPress form plugin comes with 40+ form fields and gives you full control to customize. The drag and drop builder allows you to create by adding a field to the builder. Also, you can use a prebuilt template for a quick start.
Integrations with Other Platforms: This WordPress has integrations with 51+ popular apps like CRM, Email Marketing Tools, Social platforms like Telegram, and many more. So you can easily send your donor data to another platform for better organization and data analysis.
Advanced Features: Besides the donation form, you can create contact forms, registration forms, newsletter forms, multi-step forms, conversational forms, and many more. This one form builder can fulfill all of your form needs. Fields like reCAPTCHA, Cloudflare Turnstile, and Honeypot will help you to prevent spam submissions.
Import/Export Form: In Bit Form, you can easily import and export forms and reuse them on your other site. Also, you can export form data as CSV, Xlsx, HTML, and many other file types.
Form Abandonment & Partial Submission: Bit Form has a smart form abandonment feature, which will help you to reach out to those people who didn’t complete the process. Suppose someone comes and puts their email and other information, but didn’t pay or submit the form. You will still get the information, and reach out to them to complete the form. This will surely increase the donations.
Affordable: Bit Form is highly affordable and comes with yearly and lifetime plans. That means you pay once and use it for a lifetime without any extra cost.
Create an Online Donation Form with Payments in WordPress
Let’s create an online donation form in WordPress with the Bit Form plugin. Follow these simple steps and make donation collection easier and efficient.
Step-1: Install & Activate Bit Form
First, you need to install the Bit Form plugin on your WordPress site. To install Bit Form, navigate to your WordPress dashboard> Plugins> Add New. And search for Bit Form. Once you see it, install & activate it.
Step-2: Create a New Form
Now we have to create a new form. To create a form, navigate to the Bit Form menu from your WordPress dashboard. Now click on the “Create Form”, choose a template or start from scratch by selecting Blank template.
Once you choose, it will open the Bit Form builder. Here, you need to build the donation form with the fields as per your needs.
Step-3: Add Fields to the Form Builder
Now we need to add all related fields. To add any field, just search for the field on the left side and drag and drop the field into the builder. Here I have added the name, email, and phone number fields. You can easily change the field name and label from the field settings. Also, you can make them required if needed.
I’m going to create a “Disaster Relief Donation” form, so I will add name, email, phone number, two dropdown fields, select amount fields, and finally, the payment fields. In this form, I will use Stripe as our payment gateway.
As we have already added the name, email, and phone number fields, now let’s add the dropdown fields. First, I will add a dropdown for “Choose Your Area of Support”, where I will give options to select, such as “Emergency Relief, Food Aid, Shelter, etc”. You can add as many options as you need by clicking on the “Add More +” button. You will get all settings in the field settings of Bit Form.
Now I will add another dropdown field to know if the person is interested in donating monthly or yearly. So will add dropdown options such as one time, monthly, yearly. To add another dropdown, I will just duplicate the previous dropdown and change the content in the duplicated dropdown fields.
To clone any form field in Bit Form, just click on the clone icon. It will clone your form field instantly.
Once you have cloned it, change the content for the new cloned dropdown field. Now I will make two columns for the two dropdown fields.
Bit Form builder supports a 60-column grid. So you can you can add and divide your form into multiple columns. To adjust the column width, just drag the three-dot icon and adjust the column width. Also, you can adjust the column width from the Size & Position option (From the field setting).
Now we need to add the donation amount field. We will add this as a radio button, where we keep some predefined amounts such as 50 USD, 100 USD, 200 USD, and more. And will allow the user to donate a custom amount.
Now I will make the options divided into 3 columns for better visual. To do that, just change the column number from 1 to 3. You can divide it into as many columns as you need. Also, enable the “Allow Other Option”; it will allow the user to input a custom donation amount.
Once you are done, click on the Update button to save your changes.
Step-4: Add Payment Field
Now the final stage, we need to add the payment field. Bit Form supports PayPal, Stripe, Razorpay, and Mollie. You can use your preferred payment gateways with your form. For now, I prefer using Stripe, so let’s configure Stripe on our form.
To configure the payment, navigate to Bit Form App Settings> Payments> Select your preferred payment gateways.
Once you select the gateways, you will need to add your credentials here (Publishable Key & Secret Key). You will get these credentials on your gateway’s developer dashboard. Copy the keys and paste them into the designated field. Also, you will get all the instructions and documentation links on the page.
After pasting the keys, click on the Save button. Once it is successful, you will see the connected accounts below.
Now navigate to forms and open the form. Add the payment field to your form. After adding the payment field, you will see all the payment-related settings on the Field Settings. Select your preferred currency and make the Amount Type dynamic, then select the amount field. As we added the amount field as the radio field, select the radio field as the dynamic radio field.
In this form, you don’t need the submit button. Because the form will be submitted automatically after successful payment. You can’t delete the Submit button, but you can hide the button. So let’s hide the submit button. To hide the button, click on the button and enable the Hidden option.
You are done! Now you can collect donations or any type of payment with Bit Form. Now it’s time to customize and style the form as per your brand style. Follow this style guide to customize your form style.
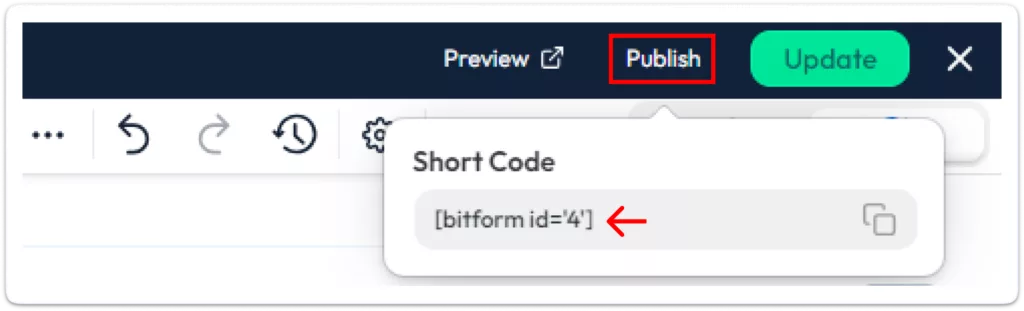
Step-5: Publish Your Form
After doing all the editing, click on the publish button and get the shortcode. Paste it on your page or wherever you want to show the form.
Here is the donation form that we have created throughout this article. You can test the form below.
Final Thought
In conclusion, Bit Form is the easiest and most secure way to collect online donations on your WordPress site. With its simple setup, powerful features, and integrations with payment gateways like PayPal and Stripe, you can quickly create customized donation forms. It’s affordable, secure, and perfect for non-profits, influencers, or anyone raising funds for a cause.
Start using Bit Form today and make the donation process simple and effective for both you and your supporters!
He writes about WordPress, SEO, automation, and SaaS with hands-on experience. He creates tutorials, comparisons, and practical content by understanding real use cases, search intent, and AI visibility.
Many WordPress users need to change their admin email for different reasons. Sometimes you lose access to your old email. Sometimes it gets hacked. And when that happens, you stop receiving important emails, like password reset links, security alerts, or update notifications. That can be a big problem. Another common reason is switching to a […]
WPForms Lite users often face a common problem. The free version does not store form entries in the dashboard. Instead, it only sends submissions by email. This means you cannot view or manage entries inside WordPress. This setup can quickly become frustrating. Important emails may land in spam or get lost. Without upgrading to Pro, […]
AI is changing how WordPress websites create content and automate daily tasks. But many website owners still struggle to connect powerful AI tools without paying extra or dealing with complex setups. While many creators are still stuck in the “copy-paste” loop with AI tools, WordPress Gemini Plugin is revolutionizing how websites use artificial intelligence to […]
Cookie Consent
We use cookies to improve your experience on our site. By using our site, you consent to cookies.
This website uses cookies
Websites store cookies to enhance functionality and personalise your experience. You can manage your preferences, but blocking some cookies may impact site performance and services.
Essential cookies enable basic functions and are necessary for the proper function of the website.
Name
Description
Duration
Cookie Preferences
This cookie is used to store the user's cookie consent preferences.
30 days
Cookie Preferences
This cookie is used to store the user's cookie consent preferences.
30 days
Cookie Preferences
This cookie is used to store the user's cookie consent preferences.
30 days
This cookie is set by Cloudflare to help manage bot traffic and protect the website from malicious activity. It does not collect or store any personal data and is used solely for security and performance purposes.
Used to determine whether a user is included in an A / B or Multivariate test.
18 months
_ga
ID used to identify users
2 years
_gali
Used by Google Analytics to determine which links on a page are being clicked
30 seconds
_ga_
ID used to identify users
2 years
_gid
ID used to identify users for 24 hours after last activity
24 hours
_gat
Used to monitor number of Google Analytics server requests when using Google Tag Manager
1 minute
__utmt
Used to monitor number of Google Analytics server requests
10 minutes
__utmb
Used to distinguish new sessions and visits. This cookie is set when the GA.js javascript library is loaded and there is no existing __utmb cookie. The cookie is updated every time data is sent to the Google Analytics server.
30 minutes after last activity
__utmc
Used only with old Urchin versions of Google Analytics and not with GA.js. Was used to distinguish between new sessions and visits at the end of a session.
End of session (browser)
__utmz
Contains information about the traffic source or campaign that directed user to the website. The cookie is set when the GA.js javascript is loaded and updated when data is sent to the Google Anaytics server
6 months after last activity
__utmv
Contains custom information set by the web developer via the _setCustomVar method in Google Analytics. This cookie is updated every time new data is sent to the Google Analytics server.
2 years after last activity
_gac_
Contains information related to marketing campaigns of the user. These are shared with Google AdWords / Google Ads when the Google Ads and Google Analytics accounts are linked together.
90 days
__utma
ID used to identify users and sessions
2 years after last activity
Clarity is a web analytics service that tracks and reports website traffic.